Description:
This simple application uses cellular automata to produce realistic
looking fire. It will generate fire of any strength, length
and randomness, and can imitate wind. You can customize
the "burning region" using image masks or text.
The fire color can also be changed easily. Large scale,
the effect is too slow to be rendered on-the-fly. However,
you can export to a quicktime movie and play back the animation
at full speed.
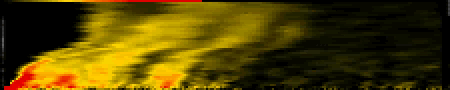
Click to watch a movie of the fire! (2.7 MB)
Requirements:
- OS X, or OS 8.6+ with Carbon Lib. Actually runs much
faster in classic than in OS X.
- A reasonably fast processor. G4 is best. I've got a
550 MHz iBook, and it's sorta slow.
- Enough memory to create a few buffers the size of
the animation. This can be anywhere between 2 MB and
200. It all depends on what size you want.
|
|
What Is Cellular Automata?
Cellular Automata can be very simple or very complicated.
In this example, every pixel in an image is blended with the pixels
next to using simple
averaging.
Cellular automata can be used for everything from weather
prediction to diffusion modeling. However, one application rises
above the rest. The Game of Life, developed by Dr. John Conway, is
perhaps the most famous math game ever invented. The game is governed
by set of complicated rules, based on which cells are near other
cells. For instance, a dead cell near three live cells becomes a
live cell. For more information on The Game of Life, see the Wonders
of Math - Game of Life.
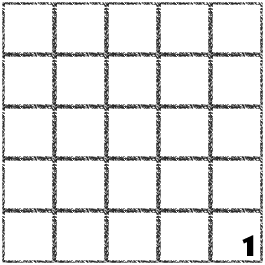
The animation below
shows
small-scale
celullar
automata like I am using to generate the fire effect. In the second
frame, a bright red dot appears in the center bottom block. This
will represent heat. Perhaps it was caused by an explosion or
the light of a match. In the third frame, the blocks immediately
surrounding
the
red
one become orange. They are taking mean value of the blocks around
them. For example, the red block is a 10, the greatest (hottest)
value possible. The white blocks have a value of 0. The orange
blocks look at the red and white surrounding them and become orange,
a 5 for example. In the final project, there is some randomization
in this process. The rest of the animation follows the same basic
principles. The explosion heat disappears in the fourth step, leaving
the rest of the energy to dissipate through the blocks. Because
the grid is constantly cooling, a small amount (1) is removed from
the values at each step. Without this removal, the entire board
would become 2/5 the value of the starting red block. (10+0+0+0+0...
divided over 25 squares). With no energy removed, the end amount
would be the same as the starting amount.
For more information on Cellular Automata, visit
the Digital
Worlds Tutorial. The code below (written in RealBasic 5) generates
a simple fire effect. This code is very similar to the stuff in
the application, but doesn't deal with wind, fire strength or
length. In this example, the
pixels are moved upwards.
for y
= 1 to cs.height-1
for x = cs.width-5 downTo 5
speed
= rnd + 1
leftcell
= cs.cells(x - 1, y + speed).value
rightcell
= cs.cells(x + 1, y + speed).value
centercell
= cs.cells(x, y + speed).value
cs.cells(x,y).value
= max(0, (leftcelll + centercell + rightcell) * firelength)
next
next |
This section loops through the two
dimensional array of cells. Each cell holds a value, which
represents the "heat" at
that location. These cells will later
be drawn on the screen by attaching a color to each value.
For each cell, the loop looks at the cells that surround it.
The value of the cell is averaged with the values of those
around it. The black cells around the edges of the image lower
the values of the ones next to them, and so on and so forth.
The result is a blended arrary of cells. Please note that the
firelength variable is a number between 0 and 1/3. |
for y = 1 to cs.height-1
for x = cs.width-1 downTo 1
if sourceMask.graphics.pixel(x,
y) = rgb(0, 0, 0) then
leftcell
= cs.cells(x - 1, y).value
rightcell
= cs.cells(x + 1, y).value
topcell
= cs.cells(x, y + 1).value
bottomcell
= cs.cells(x, y + 1).value
newValue
= (leftcell + rightcell + topcell + bottomcell) * (fireStregnth / 2)
+ Rnd * fireRandom - (fireRandom / 2)
newValue
= max(0, min(newValue, 100))
cs.cells(x,
y).value = newValue
end
if
next
next |
This loop seeds the fire. The sourceMask determines
which cells are seeded with random values. You can create your
own sourceMask, or let the application do it for you. The mask
is a black and white picture, where only the black pixels are
seeded. The rest of this loop is almost the same as the one
above. A newValue is calculated for the cell based on the ones
around it and quite a bit of randomization. The newValue is
checked to make sure it is positive, and within the range of
the colors. |
Walkthrough:
Okay. let's take a look at the fire application itself. Click
the download link at the top of the page to get started. Wait
for the download to finish and launch the Cellular Automata application.
The program only has one window, which appears when it starts.
From this window, you can control and export the fire effect.
The picture below shows the defaults:
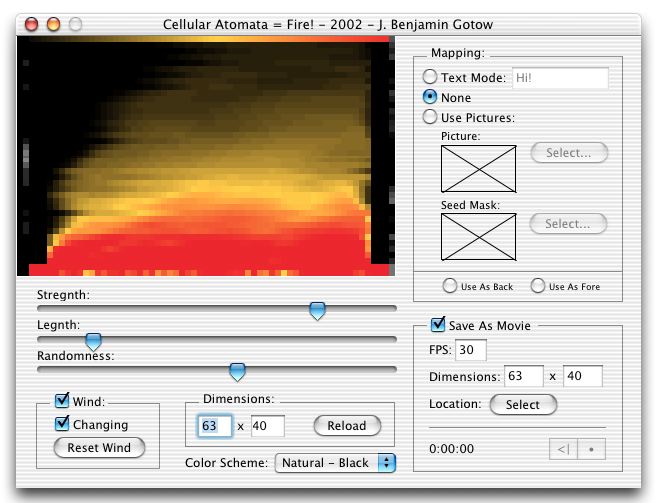
| Here's how it works: the left side of the window allows
you to customize the fire, and the right side deals with
mapping and exporting. The display is located in the top-left
corner and shows you exactly what the fire looks like. Within
the display, the top row of pixels shows the flame gradient,
the colors that it is using to render the fire. The left
and right sides of the image are the wind strengths. These
control how hard the wind pushes the fire.You can also see
the display from the dock. (See image at right). |
 |
The strength, length and randomness values are probably the
most confusing in this setup. The strength property controls
the heat
of the fire. Increasing the strength will increase the average
heat of pixels in the seed area. The length property controls
how quickly the heat dissipates as the cells rise. It must be
less than 1/3. Finally, the randomness controls the consistency
of the seed area. At peak randomness, the pixels will be generated
almost completely at random. Lower values will result in a much
more consistent effect.
The wind is actually very cool. Turn on wind, and the fire "cells" are
pushed to the left. Check the "Changing" box, and the
renderer will use cellular automata to vary the strength and
direction of the fire. The bars in the far left and right of
the display show the wind strengths. Brighter pixels push harder.
Depending on the speed of your computer, you may want to change
the dimensions of the display. This can also be very useful if
you are trying to generate fire of a specific size. Change the
values, and press the reload button to reset the display.
The fire application has a few built in color settings. You can
switch between natural fire coloring and chemical fires, and
change the background from white to black. However, you can easily
create your own color schemes by adding a line or two of code.
Open the Globals module and look in the "createColorSchemes" method.
For each scheme, the code sets up key colors. The key colors
define points in the gradient. The application blends between
these points to produce the entire range of colors. If you have
ever used photoshop gradients you already know how this works.
To create another gradient, just add the following code:
s = new CA_ColorScheme
s.colors.append rgb(0,0,0)
s.colors.append rgb(255,225,0)
s.colors.append rgb(239,0,0)
s.name = "Natural - Black"
ColorSchemes.append s
Replace the rgb values with the colors you want. RGB means red-green-blue. The
three values you provide (max = 255) determine what colors are used. Many graphics
applications will tell you the rgb values, and you can just copy them from there.
You can add more key colors by repeating the command "s.colors.append rgb(0,0,0)" with
the colors you want.
The mapping section may seem the most confusing. This section controls which
cells of the image are seeded with the fire. In "None" mode, the bottom
two rows are used, so the fire simply goes from the ground up. In "Text" mode,
the fire application generates a mask, which determines where to seed the fire.
It draws the text onto the mask and the fire is produced from there. In "Use
Pictures" mode, you provide your own masks. The seed mask is a black and
white picture, where the black pixels are seeded areas. The other image is just
for the looks. If you want, for instance, to light a farmhouse on fire, you would
put the actual image of the farmhouse here. You can specify wether the image
appears in front of or behind the fire using the radio-buttons at the bottom
of the box. To temporarily hide the foreground image, hold down the option key.
This is very useful to determine if you are seeding correctly. The picture below
shows the text, none and picture modes. 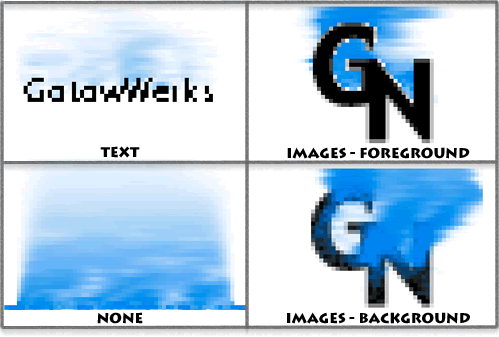
The last section is relatively simple. Check the "Save as Movie" box,
provide an FPS (frames per second) and export dimensions. The dimensions of the
movie do not have to be the same as those you are using in the display. If you
want to scale the movie on export, make the dimensions larger! Select a location
to save the movie and press the • button to begin recording. Press it again
to stop. The restart button "<|" erases the movie so you can start
over from scratch.
Note: You may have to quit the fire application before you can view the movie
you create. I have been having some trouble forcing RealBasic to save the movie
after you finish recording. If quicktime says the movie is "an invalid movie
format", quit the fire app and then open the movie.
Well! I think that's just about it. If you have any questions about cellular
automata or the fire application, drop me an email and I'd be happy to help.
I know my code is badly commented, but hey! that's why it's called code. :-)
Frequently Asked Question: Why is it so freakin' slow? When I started writing
the cellular automata code used in the fire application, I had no idea how much
I would end up doing. The color scheming could be sped up quite a bit (when the
CA_Display asks for a color, the CA_ColorScheme creates it from scratch. I should
just cache them in an array), and if I thought it out, I could probably get by
with fewer off screen buffers. Oh well. version 2.
Version History:
1.0 = The current version. Does everything I need it too.
If I end up getting a lot of requests for improvements,
I will probably make another
version.
- J. Benjamin Gotow
webmaster@gotow.net
|