Description:
What is Jointed Animation? Jointed Animation is a utility that allows
you to create and animate models with "bones". The animations
and model definitions can be stored for later use in games. The classes
controlling the model and its animation are very simple to use, and could
be added to a game engine very easily. Jointed Animation uses the 3DMF
file format for storing the 3D data, and it's own animation format. The
download comes complete with sample animations and source code. Download
it and mess around!
Requirements:
- Quesa or Quickdraw 3D (www.quesa.org)
- OS X, or OS 8.6+ with Carbon Lib.
- At least 8 MB of video memory (this is just a speed
thing - it will work without any, but it might not
be pretty).
|
|
Walkthrough:
Okay. Download Jointed Animation by clicking on the link at the top of
the page and we'll get started. Launch the Jointed Animation application.
A splash screen appears with the Gotowerks logo. This is completely
unnecessary, but looks very cool.:-). However, it gets incredibly annoying
if you are actually trying to use the software. Hold down the option
key or click on the window to skip it.
Lets start by looking at one of the sample models. Select File > Open...
from the menu. Open the Sample Models folder and click the Tank Driver
folder. Select the man.mdef file from within this folder. A window appears
showing the source of the model.
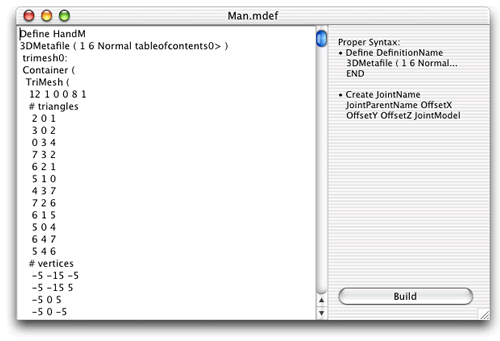
You will need some background knowledge of 3D before you can
program your own models this way. The source is essentially just
a bunch of 3DMF's assigned to specific bones. The beginning of
the source file names the 3DMF's. For instance, the first line, "Define
HandM" tells the compiler that the following model is called
HandM. Scroll down a bit until you see the "END" statement.
You can see where the next definition starts. Now move all the
way to the end of the file. The last page or so is the actual
skeleton. This code creates the joints and attaches them to other
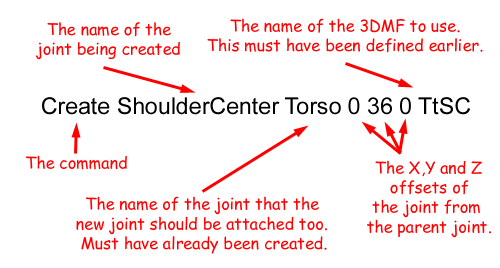
joints. The first joint that is created is the "Torso".
This is the foundation. It is the center of the skeleton, the
bone which is not attached to any other bone. The second joint,
the "ShoulderCenter" is attached to the torso at a
distance of 36 Y. This means that the ShoulderCenter must always
stay 36 units away from the Torso. Your elbow will never overlap
your wrist because they are attached to each other. Same idea.
The Y means that, by default, the joint appears above it's parent.
| In 3D, Y is the vertical axis (up and down), X is the horizontal
axis (left and right) and Z is the depth axis (near and far
away). The picture to the right shows these axes intersecting
a cylinder. |
 |
The last word of the line of code is the 3DMF
that is attached to the joint. If you provide an invalid name
the build will fail. If you enter "none", a straight
line will be used instead of a model. The model is used to provide
form to the joints. The models are what actually give shape to
the skeleton. The skeleton itself is invisible.
Note: When you create the 3DMF's, make sure the place where the model
joins the joint is 0,0,0. If you were creating a model of someone's
lower leg, the 0,0,0 point would be near the joint, the knee.
Okay. Enough of that. Click the build button. The model will compile
(providing that you haven't changed anything :-) ), and the animation
window will appear. This window allows you to program your model to
move. Load an already created animation by selecting File > Open...
Select the "Man Running" animation in the Guy folder. Another
open dialog box will appear. When you load an animation, you must also
load a model to use with it. Model information is stored separately
from animation information, so the same animation can be used on multiple
models - providing that the joints have the same names. Select the
Man model or the Tank Driver model. Another animation window will open
showing the model.
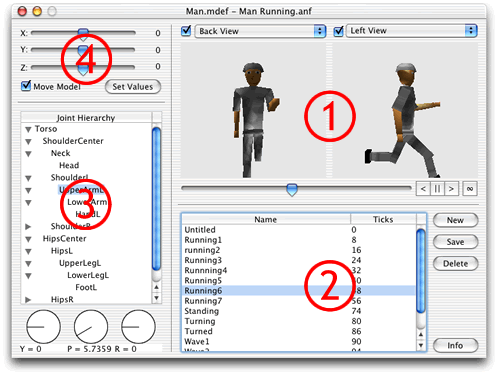
This window is divided into four sections:
- The first is the display region. The views here allow you
to see your model and how it appears in the animation. The
animation controls and timeline are also in this area. The
views can be toggled on and off individually to increase performance.
The second area deals with animation key-frames. The key-frames are
steps the model takes to reach it's goal. If the character is running,
for instance, you might have key-frames for each of the major leg positions.
When the animation is played, the model transitions between the key-frames,
resulting in smooth, unbroken motion.
- To create a key-frame, position the model the way you want
it and press the new button. Enter a name for the position
and a time in ticks (60ths of a second). The times are used
to properly space out the key-frames, so the model doesn't
jump between them too quickly. Please note that in the animator,
the maximum number of ticks is 100. The animation engine is
based on ticks, but the actual animation plays much slower
(at least on my machine). 10 ticks is about one second.
If you decide to change a key-frame, move the model to the new position
and press the save button. The new model orientation is saved over
top of the existing data.
To change the name or "ticks" of a key-frame, press the info
button. Enter new values and press OK.
- The third region allows you to move the model. The hierarchical
listbox displays the joints in the model. Select one of them.
Click inside of one of the circular dials below the list. The
line moves around the circle, changing the pitch, roll or yaw
of the selected joint. The letter below the dial shows which
property it controls. Y is yaw, P is for pitch, etc... If you
find the dials difficult or annoying (they can be really frustrating),
just click the value below the circle. A dialog pops up and
you can modify the values manually.
- Finally, the fourth region allows you to modify the location
of the central joint, in this case, the Torso. Adjusting a
slider will move the character along that axis. These values
are included in the key-frames and can be animated along with
the pitch, yaw and roll. If, for example, you were animating
a person running, you would use these sliders to actually move
the characters body as he took each step. The "Move Model" check
can be used to temporarily turn off the model movement. If
you are trying to perfect animation the movement often gets
in the way. Finally, the Set Values button allows you to manually
enter the X, Y and Z values.
That's a brief overview of Jointed Animation. If you need help using
Jointed Animation, or would like to integrate it into your project,
please email me at webmaster@gotow.net.
I may be able to help! The source is included in the download, so feel
free to mess around with it however you want. If you use the animation
and model classes in your project, let me know!
Version History:
1.0 = The current version.Does most everything I need it too. If I end
up getting a lot of requests for improvements, I will probably make another
version.
- J. Benjamin Gotow
webmaster@gotow.net
|